
Sewing patterns are sized by body measurements, not by the size label in your shop-bought clothes – and the two rarely match. Taking a full set of accurate measurements is the single best way to make garments that fit. Here is what to measure, how, and how to use the numbers.
Before you start
- Use a soft tape measure and a mirror – or better, ask someone to help.
- Wear close-fitting clothes or underwear you would wear under the garment.
- Tie a piece of narrow elastic or string around your natural waist as a reference line.
- Keep the tape level and snug, not tight.
- Write everything down in both centimetres and inches.
Upper body
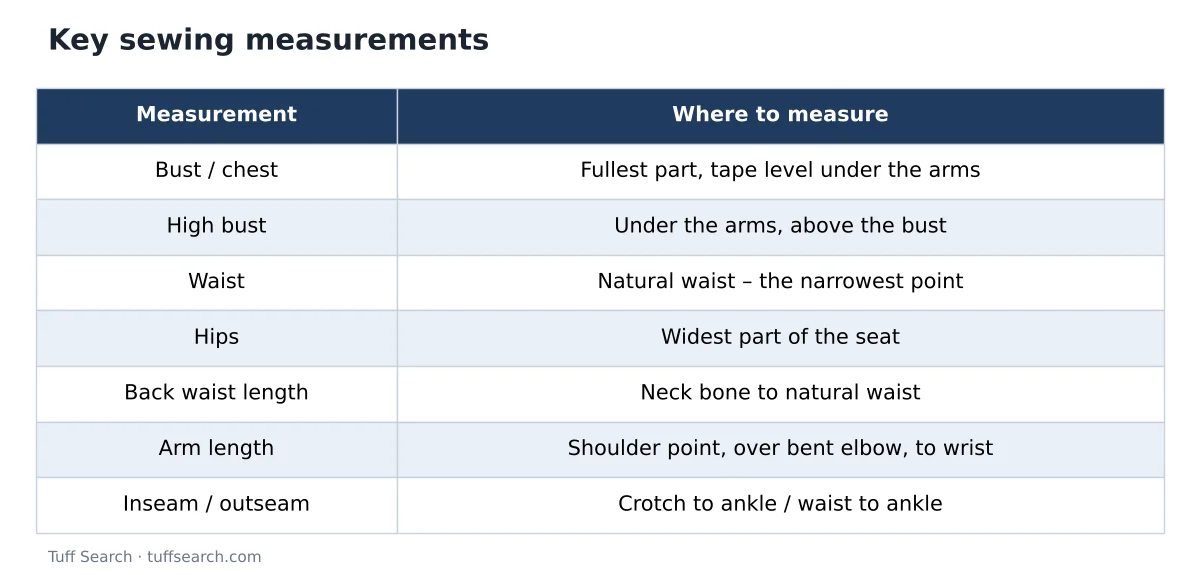
- Bust or chest: around the fullest part, tape level across the back.
- High bust: under the arms and above the bust. Many sewists with a cup size above B choose their size from this measurement and adjust for the bust.
- Waist: at your natural waist – the narrowest point, where the elastic settles when you bend sideways.
- Shoulder width: from the bony point of one shoulder to the other across the back.
- Back waist length: from the prominent bone at the base of the neck down to the waist elastic.
- Arm length: from the shoulder point, over a slightly bent elbow, to the wrist bone.
- Neck: around the base of the neck, for collars.
Lower body
- Hips: around the widest part of the seat, keeping the tape level – check in a mirror from the side.
- Inseam: from the crotch to the ankle along the inside leg (easiest measured on a pair of well-fitting trousers).
- Outseam: from the waist to the ankle along the outside of the leg.
- Skirt length: from the waist to where you want the hem.
Our guide to measuring your waist and hips has more detail on getting the tape in the right place.
Choosing a pattern size
- Tops and dresses: choose by bust (or high bust), then grade at the waist and hips if needed.
- Skirts and trousers: choose by hips, then adjust the waist.
- If you fall between sizes, check the finished garment measurements printed on the pattern.
It is normal to be one size at the bust and another at the hips. Blending (“grading”) between sizes along the seam lines is a standard technique.
Understanding ease
Ease is the difference between your body measurement and the finished garment measurement.
- Wearing ease is the minimum extra room needed to move, breathe and sit – a few centimetres at the bust, waist and hips for woven fabrics.
- Design ease is extra fullness added for style, such as an oversized shirt or a full skirt.
- Knit garments can have negative ease – smaller than the body – because the fabric stretches.
Compare the pattern’s finished measurements with your own to see how much ease the designer intended.
Using your measurements
A circle skirt is a good first project because it needs just two measurements. The waist opening is a circle whose radius is your waist measurement divided by 2π:
Waist radius = Waist ÷ (2 × π)
For a 70 cm waist, the radius is 70 ÷ 6.283 ≈ 11.1 cm. Add your skirt length to find the outer radius. The circle skirt calculator works out both radii and the fabric you need, and the fabric calculator helps with yardage for other patterns.
Keep your measurements up to date
Re-measure every few months, or whenever your fit seems to change. Keep a card or note on your phone with the date, so you always cut the right size.
Frequently asked questions
Bust, high bust, waist, hips, back waist length, shoulder width, arm length, inseam and outseam cover most patterns.
Pattern companies size by body measurements, while ready-to-wear sizes vary by brand and are often smaller numbers for the same body.
Choose tops by bust (or high bust) and skirts and trousers by hips, then grade between sizes where needed.
The difference between your body measurement and the garment’s finished measurement – room to move plus any extra fullness for style.